
Table of Contents
With the Organizer, you keep track of the in-depth structure of your story. You get an overview of your chapters, scenes and all additional information such as comments, character appearances, key events, plot threads and more.
Secondly, you can actively use the Organizer to plan and redesign your story by rearranging chapters and scenes or even create new ones.
To provide you with complete continuity the Organizer interacts with the other Papyrus Author planning tools such as the Timeline and Thinkboard.
To open the Organizer, click on the ![]() icon next to the Navigator at the bottom left of the Papyrus Author window (next to the Navigator icon). You can also access the Organizer through the “Author” menu.
icon next to the Navigator at the bottom left of the Papyrus Author window (next to the Navigator icon). You can also access the Organizer through the “Author” menu.
A Complete Overview
When it comes to the overview of your chapters, scenes and events, the Organizer resembles its little brother, the Navigator. All elements in the Organizer are based on this structure.
By taking advantage of a full window, however, you have a much more detailed view.
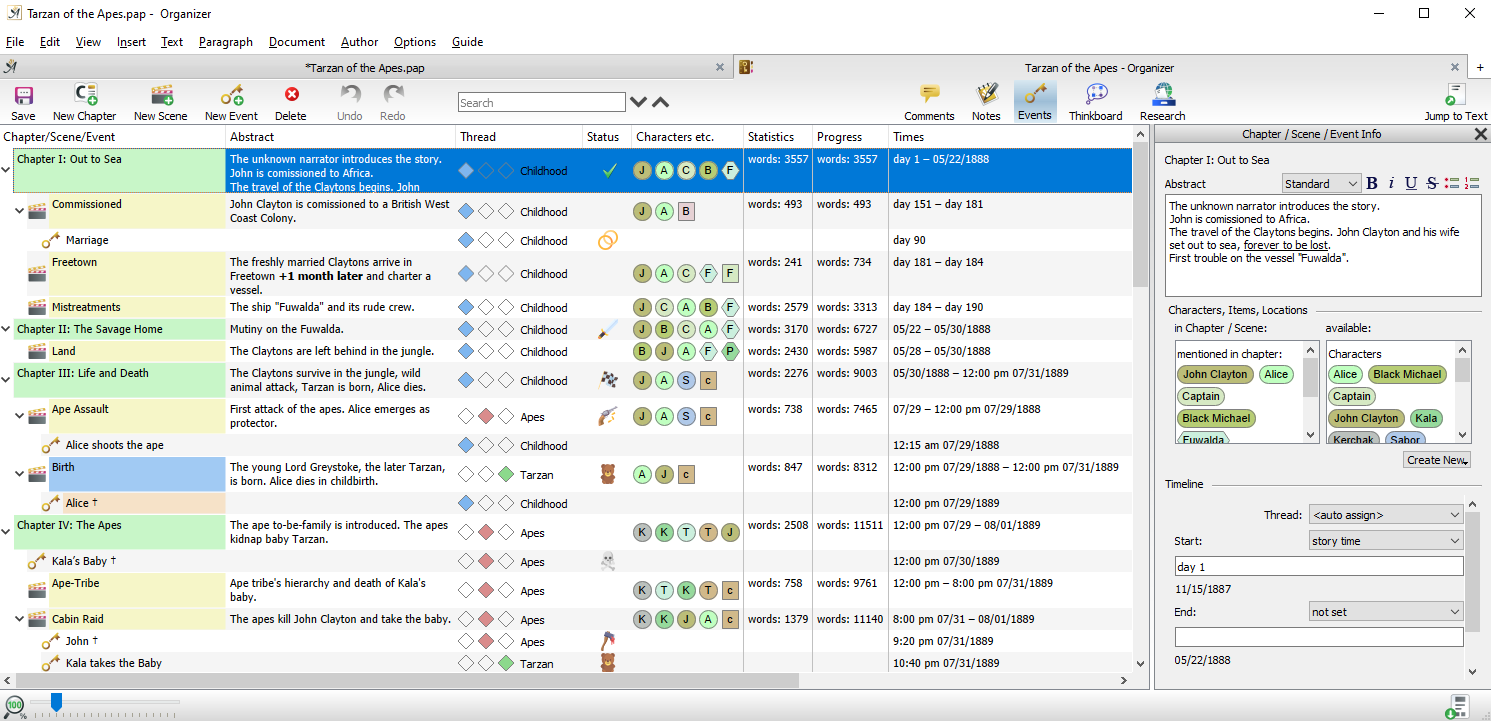
The Papyrus Author “Organizer”
Scenes are treated like sub-chapters, although they have no heading in the actual text. They are displayed for the author with a comment box (but this is not printed or exported). Of course, a simple short story could consist of scenes only.
All other display elements are part of a chapter or scene. You can choose what is displayed in the Organizer with the appropriate toolbar icons: comments , notes (for chapters/scenes) or key events for important moments in your story. Elements you inserted from the Papyrus Author Thinkboard and research from the internet or other sources (stored in your “My Research” database) can also be shown.
In addition, there are columns with information about your chapters and scenes.

Select which information and how much to display via the context menu of the column headers.
You can also change the width of the columns or the order in which they appear by “grabbing” them with the mouse.
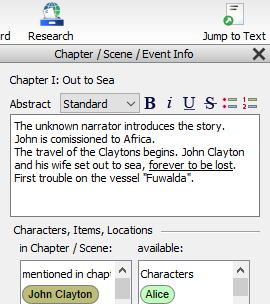
The “Abstract” field in the Organizer dialog.
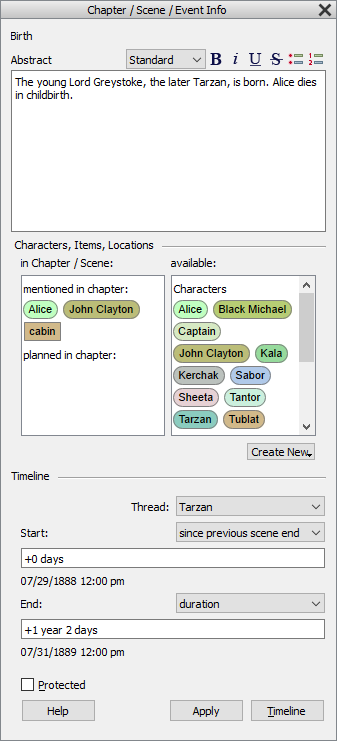
In the “Organizer Dialog” on the right-hand side of the Organizer window, under the “Chapter / Scene / Event Info” section, the “Abstract” field allows you to enter free text information. This may be an abstract of the chapter/scene or central questions and general information that you want to remember.
You can edit this text both directly in the Organizer table (by double-clicking in the “Abstract” column) or in the input field on the right. The contents are mirrored in the “Abstract” tab of the Navigator Display in the main text window.
You can also set how many rows of text should be displayed in the column. This can be done in the context menu of the column header.
You can change which thread an element is in using the colored diamonds.
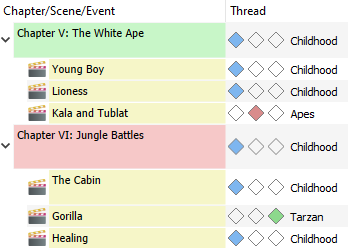
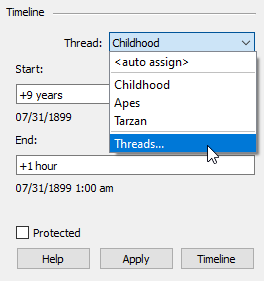
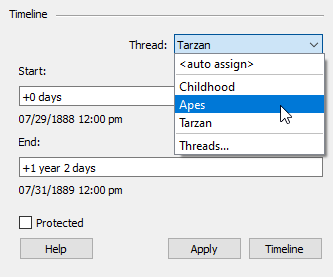
The “Threads” column in the table indicates which narrative (plot) thread the respective chapter, scene or event belongs to. They are displayed in the tabular overview as colored diamonds with their names alongside. You can change the thread an element belongs to by clicking on the current colored diamond and dragging it to the new thread. The color and name will change as you switch diamonds. The plot threads match the colored bars in the Timeline.
Managing threads through the Organizer dialog.
Alternatively you can set and change the threads in the Organizer dialog on the right. The “Timeline Threads” dialog for managing your threads can be accessed via the “Thread” drop-down in the “Timeline” section. This dialog can also be accessed by selecting “Threads…” from the context menu of the “Thread” column.
The Status column displays icons highlighting important aspects of your chapters, scenes and events. You can select a suitable icon from the context menu (this can also be done in the Navigator context menu under “Status”). Work-related icons are available or you can select an “Emotional” icon from the submenu.
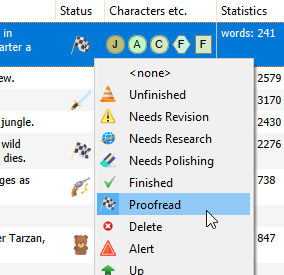
The “Status” icon menu
In the column “Characters, etc.” you can see all characters that appear in chapters or scenes, provided you have included them in the “My Characters” database belonging to the text. You can also include characters you plan to use in the chapter but have not yet written into the text.
The characters are displayed either with only their initial letter or with the complete name. You can find the setting for this in the context menu of the column.
In addition to the characters in the story, you can include important objects (“My Things”) and “My Places” that have been mentioned in the text.
In “Statistics” you see the figures for how many words (or characters, paragraphs, pages, etc.) the respective chapter or scene contains. Please note: The values for scenes are included in the figures for the chapter to which they belong. You can select which statistics are displayed by right-clicking in the column header.
In “Progress” you see how far your story has progressed overall. The value in this column represents the sum of the text up to and including the respective chapter. Note: Scenes within a chapter show the word count up to and including that scene. As such, their value will appear lower than that of the chapter they belong to.
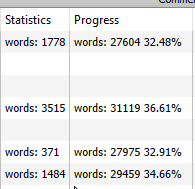
Document statistics: showing word count including as a percentage of your target.
If you have set a “Target” in “Document” → ”Document Properties”, your text progress is displayed as a percentage of your goal. This way you can always see how much of the desired total amount of text you have already achieved.
This number is also useful to keep track of your story’s dramaturgical composition. You can, for example, check how long your story takes to get to the first plot twist; whether your climax is at the right spot in your story arc; and so on.
The last column displays the times (in relation to your story timeline) of your chapters, scenes and key events. Together with the Timeline you can keep track and control the flow of your story’s chronology. The times you set in the Timeline are those shown in this column of the Organizer. For a more detailed description of the different ways of entering times and dates, please refer to the article on the Timeline.
Planning and Revising in the Organizer
The Organizer does not just give you an overview of your project. It lets you plan, revise and even create new parts of your story on the spot.
 Assigning a chapter, scene or event to a certain plot thread can be done by clicking in the desired diamond.
Alternatively, you can assign a thread in the Organizer dialog. From the “Thread” drop-down list, select “Threads…”. This will open the “Timeline Threads” dialog where you can create new plot threads or rename them.
You can rename every chapter, every scene and every event in the Organizer by clicking into its title.
If you do not like the chapter or scene order, you can simply grab and move them with the mouse. The corresponding text will also be moved accordingly. Events cannot be moved in this way, because their appearance depends on the scene containing the text assigned to the event.
You can also create new chapters or scenes from within the Organizer.
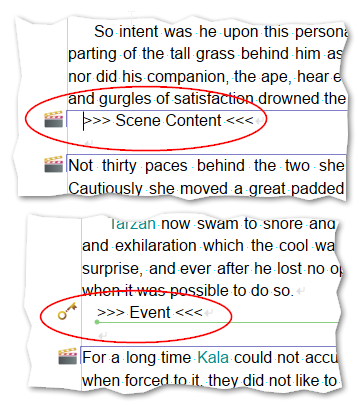
How new scenes or events appear in your main text when added via the Organizer
Added via the toolbar icon, the new element will always be created under the location you have highlighted. If you add the element via the context menu, you will have the option to add before or after your current location. You can, of course, freely move the new element once it has been created.
For a new chapter, a heading is created at the appropriate position in the text and an empty line is inserted underneath.
A new scene is created within the text. To mark it from the end of the previous scene and the start of the next, default text (“>>> Scene Content <<<”) is inserted. You can then delete it when the scene is filled with real text later.
New events can only be added via the toolbar icon. A new event is added at the end of the currently selected chapter (or scene) and receives the text >>> Event <<<<.
This functionality gives you every opportunity to plan, rework and expand your story as desired. The overview of the structure is retained in full.
The Organizer Dialog
The Organizer dialog.
The Organizer dialog, on the right of the Organizer window, lets you view and edit the details of the selected element (chapter, scene, event).
If the dialog is closed, it can be opened again with the notebook icon at the bottom right of the Organizer window. ![]()
Entries here in the dialog, or directly in the table, correspond to each other and always appear at the other location as well
The Organizer dialog displays the title of your selected element at the top. Then follows the “Abstract” field (which can be used in many different ways: As an abstract, to-do list, summary or simply for comments and/or notes that are important to you).
You can format this text from the input fields in the dialog directly above the “Abstract” field. The text style can be chosen from the drop-down and you can create bullet or numbered lists.
“Characters, Items, Locations” displays the characters, things and places mentioned in the chapter provided you linked your document with a “My Characters” database. If you plan to add another character to the chapter, you can access the pool of all available protagonists that you have created in your “My Characters” database. Simply grab a character from the “available” pool on the right and drag it into the chapter list on the left. It is easy to distinguish between characters which are mentioned and those that are only planned as the field is divided to display this information.
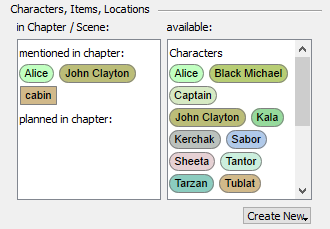
Planning which characters should appear in this chapter.
With “Create new” you can create new characters, items or locations directly in the appropriate table of the “My Characters” database, which are then immediately available here in the dialog.
The plot thread of the current chapter (or scene or event) can be selected either directly in the Organizer table by clicking on the appropriate diamond or from the “Thread” drop-down in the Organizer dialog.
Changing the story thread through the Organizer dialog “Thread” drop-down.
Here you can also access the “Timeline Threads” dialog, where you can manage your threads.
Finally, you can enter the start and end times for chapters and other elements.
The times correspond to those which are also displayed and used in the Navigator or the Timeline itself.
 on April 1, 2020