
Table of Contents
Everyone works differently. Some may like to work in full-screen mode with the text centered; others may like to have many different windows open at the same time. With Papyrus Author, you can decide how you would like your workspace to look.
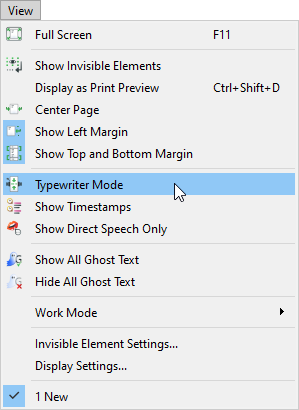
The “View” menu offers many options for customizing your working space
Under the “View” menu there is a variety of settings available:
A “Full Screen” mode as well as the option to “Display as Print Preview,” which will show you nothing but the elements that still remain in a printed document. You can also choose to “Show Invisible Elements” (such as paragraph ends, space, etc.). To change the settings for these display elements, select “Invisible Element Settings…” (this opens “Element Display” dialog in “Preferences”).
You can also decide whether you would like the Pinboard to appear on the right of the screen and/or the left. If you would like the Pinboard on both the right and the left, you can choose “Center Page.” You can also show or hide the left, top and bottom margins.
There are additional options in “View” that are especially designed for authors:
The “Typewriter Mode” allows you to keep your eye focus on one line near the middle, or two thirds, of the text area (corresponding to “Preferences” → “Display”). The “Show Timestamps” show you when your paragraphs were last altered. When you choose to “Show Direct Speech Only”, you will be able to concentrate on the dialog in your story. The other options relate to hiding or showing the Ghost Texts, which are pieces of background information or unfinished chapters you want to save, but do not want to appear in your final document.
In this menu you can choose which “Work Mode” you would like to use. In “Preferences” → “Appearance” you can change the settings for the “Work Modes” (and then choose a mode under “View”).
“Display Settings…” will open another dialog that allows you to change the settings on how to display your pages, for the ruler, text cursor, graphic object handles, as well as setting the color for text selections, page background and the text color when working with direct speech.
The list of documents at the bottom of the “View” menu detail the “Tabs” which appear above your toolbar and display all documents you currently have open in Papyrus Author. This allows you to work on more than one document at a time and to toggle between them.
If you grab one of the tabs and pull it out, you can display this document in its own window. You can also grab a document and pull it into another window, which will then display that document with a tab. The order of your tabs can be changed by dragging and dropping.
If you want to drop text or a graphic in a tab that is not currently displayed, you can hold your cursor over the tab and it will open.
Additional settings can be found under “Preferences” → “User Interface” → “Tabs.
Work Mode Preferences
Once you have created a working mode under “View” that you feel comfortable with, you can save it here in the “Preferences” under “Work Modes” as a “set” so you can open it again at a later time.
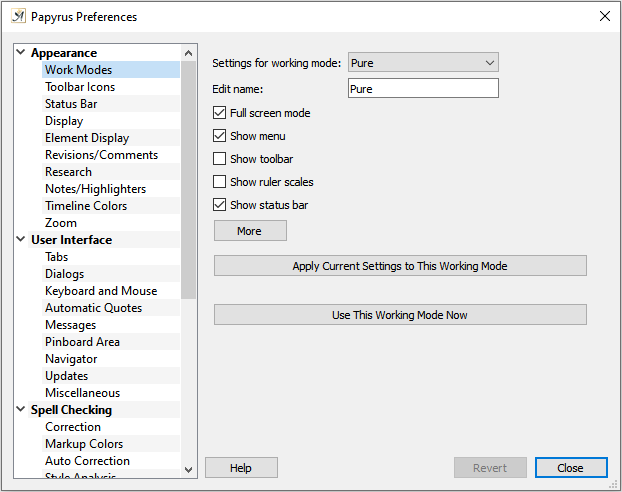
Save your customization as a work mode
The work mode will then appear under the menu “View” and will be saved with your document.
You also have options for the following:
- Full screen mode
- With or without menu bar
- Show or hide the toolbar
- Show or hide the rulers
- Show or hide the status bar
Display options for the work mode
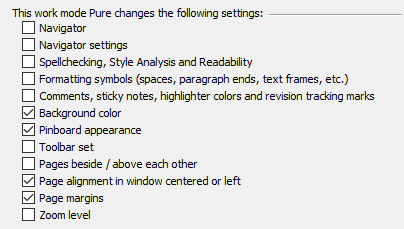
When you click on the “More” button, a variety of options will appear. If these options feel overwhelming to you, just use the predefined sets that come with Papyrus Author.
The checkboxes appearing under “More” allow you to choose which display options will be saved under this “set.”
If a checkbox is selected, the setting you have currently used in the text will be added to the set. If it is not selected, the setting will remain as is.
The checkboxes here under “More” are not like the checkboxes at the top of the dialog. They do not directly change a setting, but rather let you decide which settings should be valid for this set. This means, you can simply check the boxes that are important to your set and leave the rest unselected.
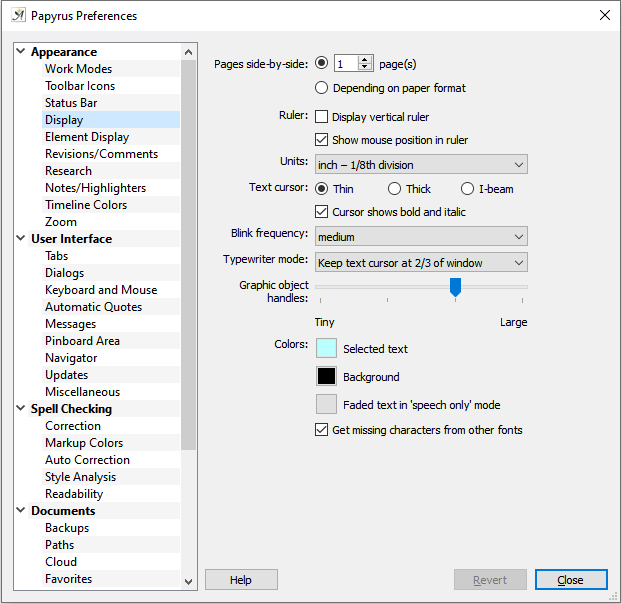
Display Settings (Page Display, Ruler, Text Cursor, …)
In addition to the settings found under the menu “View,” this dialog (under “Preferences” → “Appearance” → “Display”) allows you to choose more settings for how your document will be displayed.
Display settings
You can choose how many “![]() Pages side-by-side” you would like to be displayed. Or you can choose the option “
Pages side-by-side” you would like to be displayed. Or you can choose the option “ ![]() Depending on paper format,” which, for example, would display labels with three columns as three labels next to each other.
Depending on paper format,” which, for example, would display labels with three columns as three labels next to each other.
There are options to “ ![]() Display vertical ruler” and to decide whether or not to “Show mouse position in the ruler.”
Display vertical ruler” and to decide whether or not to “Show mouse position in the ruler.”
How the text cursor appears can also be changed in this dialog.
The “Graphic object handles” used for resizing can be made larger or smaller.
The color for “Selected text” determines what color will be displayed when you have selected an area of text (only for Windows, in Mac this is changed within the operating system itself).
For checking a document with dialog, the color you set for the “Faded text in ‘speech only’ mode” is the color for text that is not direct speech. As set in the image, above, non-direct speech would appear in gray.
And lastly, you can choose whether characters that are not available in the font you are using should be substituted with another font.
“Dialogs” Settings (Button Display)
In the “Dialogs” window under “Preferences” → “User Interface” you can choose which buttons should be set as default buttons in your dialogs.
Choose either the ![]()
![]() button, which applies the settings you have selected but leaves the dialog open for further use;
button, which applies the settings you have selected but leaves the dialog open for further use;
Or the ![]()
![]() button, which applies the settings and then closes the dialog.
button, which applies the settings and then closes the dialog.
You can encounter three buttons that undo your settings:
![]()
![]() (as long as something has already been changed in the dialog) or
(as long as something has already been changed in the dialog) or ![]() , which simply closes the dialog;
, which simply closes the dialog;
And ![]()
![]() which reverts all settings to their status before you made any changes, but does not close the dialog.
which reverts all settings to their status before you made any changes, but does not close the dialog.
In addition, there are settings here for the transparency of inactive dialog boxes.
Saving Your Settings
If you have put a lot of effort into changing your settings or have created your own sets, you will of course want to save them.
In the “Miscellaneous” dialog (under “Preferences”) you can save some or all of your personal settings. This allows you to export the settings and use them on another computer or quickly access them after a Papyrus Author update. See the article Papyrus Author Preference Application Files for information on how to do this.
 on March 26, 2020