
Table of Contents
The Timeline is a visual representation of your chapters and scenes in chronological order. The actual reading order may differ and is intentionally not the priority here. This gives you control over the temporal coherence of your story. The Timeline provides a great tool to help you with the planning of your story.
A Timeline showing three story threads (blue, red and green) with boxes depicting chapters (green), scenes (yellow) and events (red lines).
In Papyrus Author, the time data is linked to the chapters and scenes in your text. The Timeline will be automatically populated with the existing chapters and scenes from your story, ready for you to assign times. Alternatively, you can construct a story and its temporal order from scratch within the Timeline itself.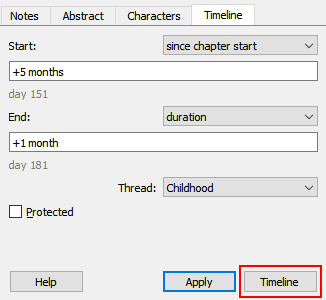
- You can access the Timeline in several ways:
With the Timeline icon in the toolbar;
 - With the “Timeline” button in the Timeline tab at the bottom of the Navigator;
- In the Navigator via the context menu select “Show in Timeline” (only if a time has already been set here before);
- Via the “Author” Menu
A Timeline is stored in the file of its associated text (.pap) document.
The Timeline Window
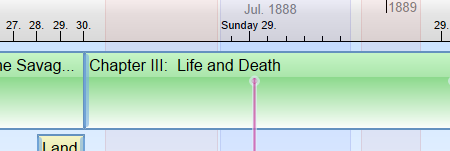
Chapters, scenes and events in the Timeline. The key events have a continuous red line through all threads.
The interface of the Timeline and how to select different elements is introduced first. How to build a Timeline from scratch and set times is explained later.
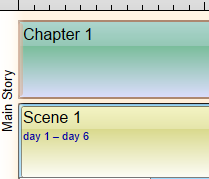
At the top of the Timeline you can see the time axis. Below, chapters are represented by green boxes and are arranged one after the other. The scenes, as yellow boxes, are under the chapters they belong to. Events are represented by red lines that end in the chapters they belong to. Key events affect all story lines and are therefore shown as a continuous red line.
Chapters, scenes and events are displayed at the times they happen. They are assigned to story “Threads”. These “Threads” are displayed in different background colors and are arranged on top of each other.
Using the icons in the Toolbar, you can decide what is shown in the Timeline:
Chapters , scenes, Ghost Text elements (displayed as grey boxes), events as well as times and acting characters . If you have assigned the elements colors in the Navigator of the main text, the boxes in the Timeline can be displayed in these colors .
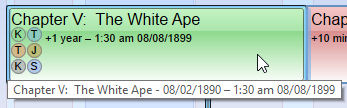
The times and first letters of featured characters are also displayed when you move your mouse over a chapter.
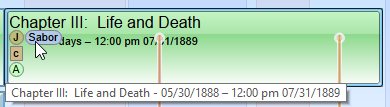 If you touch the “sphere” of a character, its name is shown in full.
Use the overview at the bottom edge of the window to determine which section of your Timeline you want to focus on. A mouse click in this bar centers on the selected element.

The Timeline overview bar. Use the slider to move the focus to a different section of your story.
If your Timeline exceeds the visible space of your window, you can grab the display slider and move it to go to the desired section.
Holding the Ctrl key while scrolling with the mouse zooms into or out of the section where your mouse cursor is located. You can also zoom in ![]() or out
or out ![]() using the two icons at the bottom of the status bar. You can reset the view to 100% with the
using the two icons at the bottom of the status bar. You can reset the view to 100% with the ![]() icon.
icon.
If you want to clear all the times you have already assigned, you can reset all times that you have manipulated with the ![]() icon. A dialog will show to ask what you wish to reset.
icon. A dialog will show to ask what you wish to reset.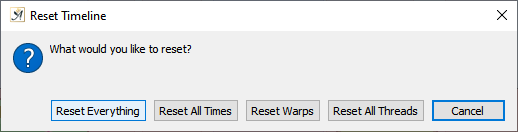
You can also correct individual errors many steps backwards with the “Undo” or restore steps with the “Redo” .
You can save changes (along with the entire text), access the Timeline settings or jump to the text document window .
Starting a New Timeline
 To begin with, you start with one “Main Story” thread. All your existing chapters, scenes and events will be included. Since no start or end times are set right now, Papyrus Author assumes a consecutive reading sequence.
For the time being, your story only has this one story thread. You can easily create additional threads by dragging elements into the free space below the existing thread with your mouse or by using the “Timeline Threads” dialog.
In the “Timeline Threads” dialog you can manage your existing threads or add new ones. You can rename them, specify the color, how they are sorted and whether you want them to appear in the Timeline window.
To access this dialog, you can use the context menu and select “Show Threads” → “Threads…” or go to “Document” → “Document Properties” → “Timeline Threads”.
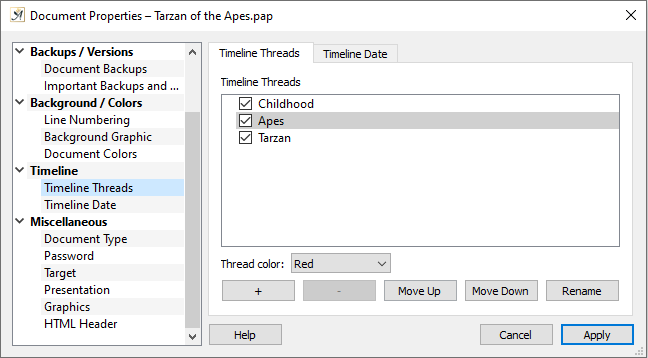
The “Timeline Threads” dialog.
The individual threads can be shown or hidden in the Timeline window by selecting or unselecting their respective checkbox.
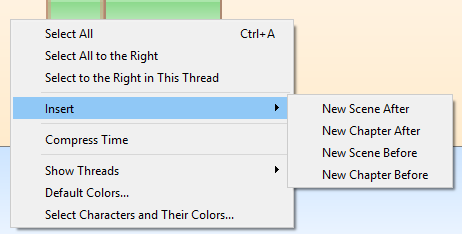
Adding an element via the context menu in the Timeline
The Timeline can be used to plan and create new chapters, scenes and events. These chapters, scenes and events are also automatically created and linked in your text document.
When you click on the relevant icon, you are asked for the title of the new element. It will then be created directly after the currently selected chapter or scene. Alternatively, you can also create elements using the context menu.
You can, of course, also delete any elements. A warning will be displayed asking you to confirm this action as deleting the element will also remove it from your text document along with any associated text.
To manipulate the times of the scenes or chapters (whether newly created or existing) double-click on the element to open the “Assign Element Times” dialog.
Assigning Times For Chapters, Scenes and Events
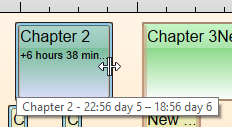
The times for the elements in the Timeline – chapters (green), scenes (yellow), events (red) – are displayed in the element boxes and while hovering over them with the mouse.
 Through these set times, the Timeline receives the information that goes beyond a pure “A follows B follows C”. The positions of the elements in the Timeline are automatically changed according to their times.
You can enter times for story elements in two ways:
- Directly in the Timeline with your mouse.
- Through the “Assign Element Times” dialog. (Found in the “Timeline” Navigator tab and in the Organizer dialog)
Manipulating Time with your Mouse
All elements – chapters, scenes and events – can be moved freely with the mouse . For example, you can move a chapter in time by dragging it to the right. This is also possible for several elements at the same time. You can draw a frame with the mouse that selects several elements at once. If you hold down the Ctrl key, you can select several individual elements at different locations with a mouse click.
Using the mouse to alter the element time.
Entries that are contained in other elements (e.g. scenes in chapters) are automatically moved with them. The same applies to elements that are connected in time (if a chapter is defined so that its start is at the end of the previous chapter, it is moved with the previous chapter).
Not only the position, but also the start and end times of chapters and scenes can be changed directly with the mouse.
You can simply “grab” the borders of chapters and scenes with the mouse in the Timeline window. If you move a border, the line “grabbed” with the mouse gets a constantly updated time stamp (this would be the set time if you let go now). On the left side of the chapter you always see the start and end time (or length) as they are currently set.
If you come close to another time entry (i.e. the edge of another box) when dragging, the mouse position engages magnetically to it. This allows you to precisely set contiguous times with only the mouse.
When moving times with the mouse, Papyrus Author tries to keep times relative. For example, the end of a chapter often refers relatively to its beginning, say +2 hours of time, and has no absolute time with a date and/or time of day.
The advantage of relative times becomes clear when you, for example, change the start time for a chapter – the chapter would still remain 2 hours long.
You can, of course, set fixed start and end times if this is what you require.
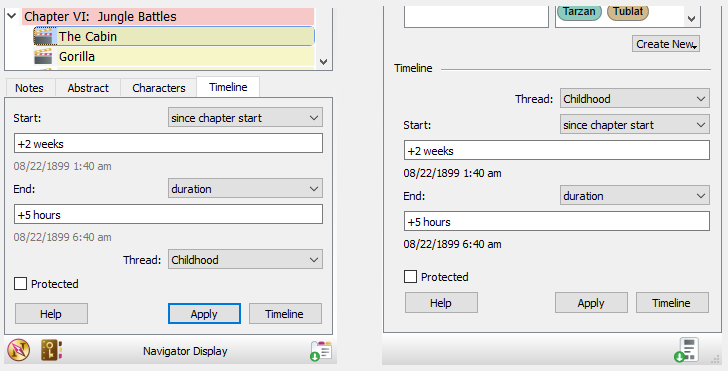
Adding Times with the “Assign Element Times” Dialog
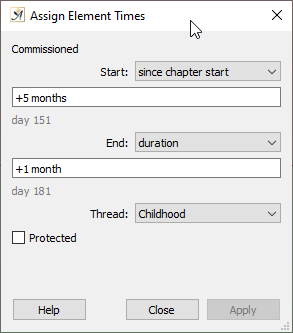
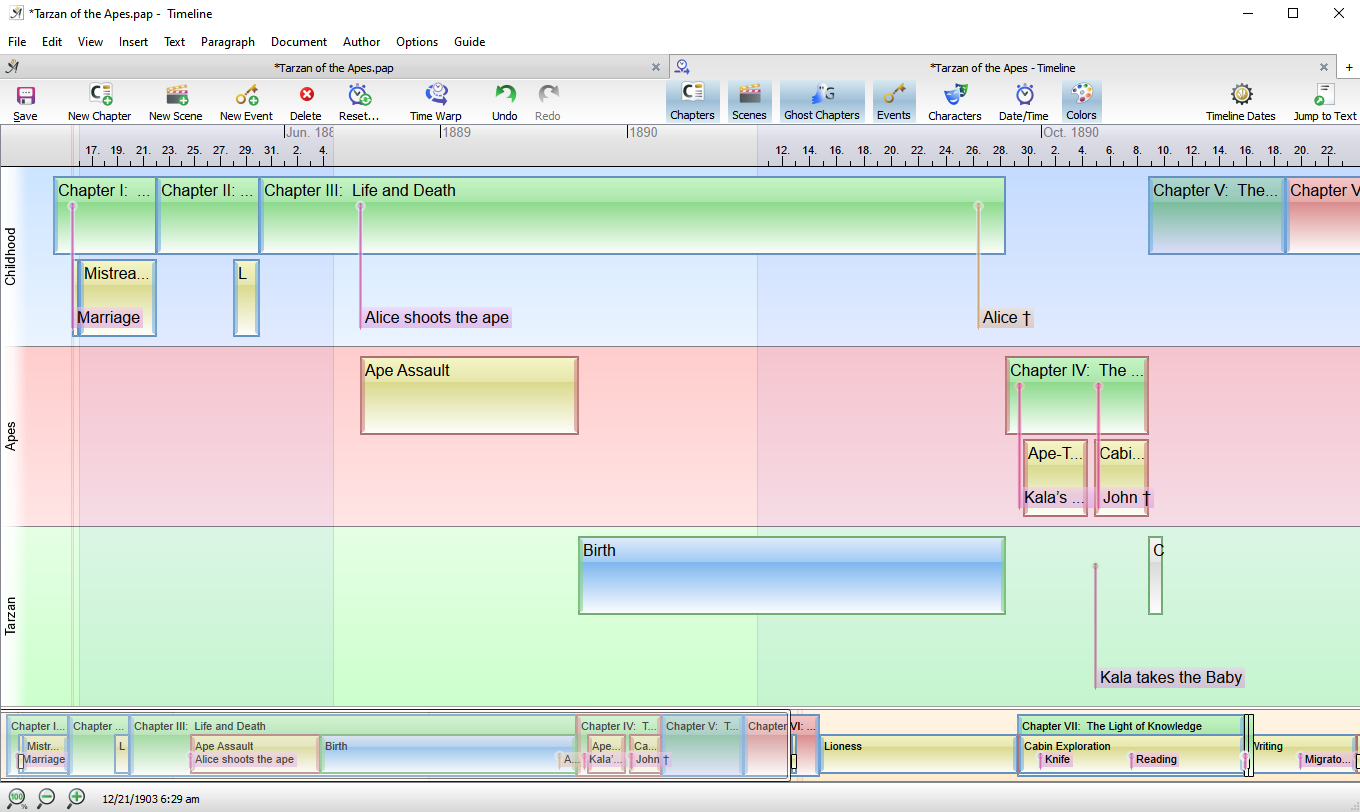
The “Assign Element Times” dialog
The “Assign Element Times” dialog is the second option for time entries. The dialog is found in several places:
- In the “Navigator”; by selecting the “Timeline” tab at the bottom of the Navigator window;
- In the “Organizer” under the “Chapter / Scene / Event Info” section on the right-hand side of the window;
- In the Timeline after double-clicking on an element or selecting “Edit Time” from the context menu.
You can precisely enter the start and end time of the element as well as the story thread.
Note that events only have one point in time and therefore no end time fields will be displayed.
That is all for as to where to enter the times for chapters, scenes and events. Now on to the how.
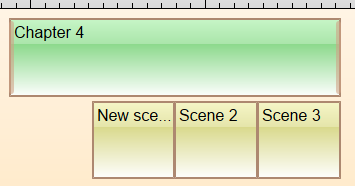
Scenes will be equally spaced unless specific times are entered
How to Set Times for your Story Elements
You can assign a specific start and end time to all chapters and scenes. As “Events” are a specific circumstance, you can only enter one time – the point at which they take place.
Times come in three variants:
- Undefined time (“not set”) is the default setting. No information has been entered yet. Nevertheless, all chapters and scenes are already visible in the Timeline without you having to assign a specific time.
Undefined times follow their predecessor, i.e. chapter “3” follows chapter “2”, etc. Undefined chapters are given a default length of a day (24 hours). Undefined scenes are divided equally into the space offered by their respective chapters. - Relative times are all time intervals that are not immovably fixed, but refer to other elements of the story. Three examples are:
– A scene starts 2 hours after the beginning of its chapter.
– The end of a chapter is 16 hours after its beginning.
– Chapter “5” begins 3 hours after Chapter “4”.
Relative time entries have the advantage that they “migrate” in the Timeline and remain unaffected by inserts or deletions before it. A scene start keeps its distance relative to the beginning of its chapter, even if its chapter is moved (e.g. if a new chapter is inserted before it). - An absolute time is a fixed date, usually for reference to a real historical event. An element with a fixed time will never be moved by inserting or deleting previous elements. The only way to change its absolute time is to edit the “Assign Element Time” dialog or by grabbing it with the mouse and moving it. Thus, a scene with a fixed start time always stays in the time range you set, and might even slip out of its chapter (which may be intended) when you apply larger shifts in the Timeline.
Time entries as distance to the story beginning are absolute times as well (in the “Assign Element Times” dialog). This type of input is called “story time”. “Day 7” would be such an entry – this time depends on the fact that there is a “day 1”. Such times are not relative, but depend on a first reference point and are therefore also fixed.
Papyrus Author allows you to mix all these types of time entries as you wish.
In the “Assign Element Times” dialog, there is a dropdown list for the start and end time of the element. Here, you set which type of time entry should be used (e.g “since chapter start”). Alternatively, the type of time input – relative or absolute – will be recognized, if possible, and set accordingly if you just enter a time.
Fixed Date Entries:
This is where you enter a specific date (with or without time).
If you enter a day of the week, the first suitable date is determined. For example, if you type “Monday” the field will be populated with the relevant date based on your other Timeline settings. If your story starts on 01/01/2000 then the date would be 01/03/2000.
Other examples of fixed date formats: “1.4.2149” or “27.04. 50 BC” or “25.4.2013 12:34”.
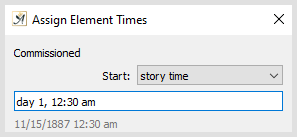 An entry is designated as “story time” if the time unit is placed first, for example “Day 1”. The same applies to an entry with a specific time (e.g. “5 o’clock” or “Day 3, 8 o’clock”). Time can also be entered in 24 hour clock format (e.g. 5:00 for 5am, 17:30 for 5.30pm).
The story always begins with “Day 1” (at midnight).
Relative time always refers to another time element, for example “since chapter start” or “since previous scene end”. All entries where the time unit comes after the number (for example “1 day” or “2 hours”) are interpreted as relative distance. Other examples of relative time are: “3 days 5 hours”, “12 years 3 days”. You can also add time intervals with a “+” or “-” (“+2:35”). So, for example, you could have a scene which starts 2 hours before the chapter start by entering “-2 hours”.
To which point a relative time refers to, will depend on what type of element (chapter or scene) it is.
- A chapter start time refers to the “previous chapter end”.
- An end time depends on the start of the element and thus defines a “time duration”.
- The start time of a scene is either determined as “since chapter start” for the first scene, or for subsequent scenes as “since previous scene end”.
- An event time counts “since chapter start” or “since scene start” and has no duration or no end time because it happens at a specific “point” in time.
You can enter time units in the following formats:
- years (always 365 days) – “year”, “an”, “y”, “a”
- months (always 30 days) – “month”, “mo”
- weeks – “week”, “w”
- days (e.g. “3d”) – “day”, “t”, “d”
- hours (e.g. “2h”) –“hour”, “h”
- minutes – “minute”, “min”, “m”
- seconds – “second”, “sec”, “s”
- “Clock”, “o’clock”, “u”, “o”
If possible, abbreviated entries are interpreted automatically, e.g. 01041980 → 1.4.1980, 1y2d → 1 year 2 days.
The fields are not case sensitive and you do not need to worry about entering singular or plural.
If possible, Papyrus Author remembers how you entered a date so it can continue to use this format (as well as for other dates relative to this one).
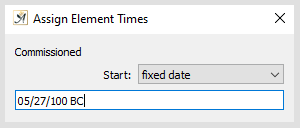 Additional information for fixed dates: Year entries are possible from -500000000 to +5000000 (without periods or commas). Dates before our calendar system are represented with “BC”, in short form or with a negative sign or “b” behind it. Weekdays are only calculated according to the Gregorian calendar. They are therefore wrong for dates before this, i.e. before the 15th October 1582. Furthermore, there is no year 0.
Times set by the user or by Papyrus Author: As already mentioned, you don’t have to manually set times if a timeline element automatically fits within the chronology. Papyrus Author always tries to place your scenes and events sensibly, even when you have not made an explicit specification.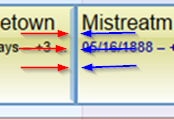
In order to be able to see which times are manually defined, the border of an element with a set time is drawn a little thicker (red arrows) than a border with undefined times (blue arrows). The right-hand border represents the “Start” time and the left-hand border represents the “End” time.
The “Timeline Date” Dialog for Fixed Dates and Story Start Dates
The “Timeline Date” dialog (“Document” → “Document Properties”) contains useful presets, which may be important for your Timeline. The dialog is crucial if you want to work with fixed dates – for example, because you are writing about historical events.
The “Story start date” is preset by Papyrus Author, if you don’t want to take care of it yourself.
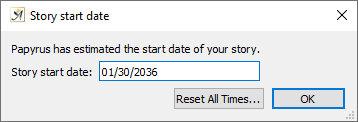 However, if you want to set a fixed date at some point in the story, you should specify a defined starting point for your story. Papyrus Author tries to set it meaningfully so if you enter a fixed date but have not specified a start date, you will be prompted to specify one.
Additionally, in this dialog you can decide whether you want time entries displayed as complete dates (e.g. “11/01/2018, 3 pm”) or you would “Prefer to show story time” (e.g. day 17, 3 pm).
Furthermore, with the “Default chapter duration” field you can set the default length Papyrus Author will use for chapters that you have not specified yourself (i.e. all chapters when you first use the Timeline).
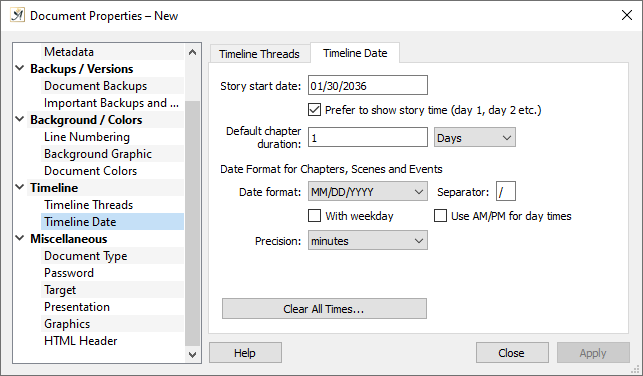
Setting the story timeline date in “Document Properties”.
You can select whether the day of the week (“With weekday”) should be displayed and whether you wish to “Use AM/PM for day times.”
The “Precision” field indicates how detailed the data (calculated internally in milliseconds) should be displayed. If your story spans many years, the display of minutes or hours would probably make little sense.
If you want to reset your Timeline, you can do so in the dialog with the “Clear All Times…” button. There is also the “Reset…” ![]() icon on the Timeline toolbar which will perform the same function. These options should be used with caution.
icon on the Timeline toolbar which will perform the same function. These options should be used with caution.
Time Lapse and Time Zoom
Time jumps or flashbacks can span decades, while the rest of the story takes place in days and hours. There is a quick way or a detailed way of dealing with large time gaps that are irrelevant to the story.
Imagine there is a leap in time over 30 years in your story, which you would like to have greatly reduced in the Timeline display, since the rest of the story takes place in a few hours or days.
Some of your scenes are just narrow lines at the edges of the Timeline, since the 30-year break takes up the overwhelming space of the Timeline window. If you right click into this unhelpful gap, the context menu will offer you the quick option to “Compress Time”.
By holding down the Alt key and scrolling down with your mouse, you can shrink the area further, to a size of your choice.
A timeline displaying the “Time Warp” feature. In the red areas time has been condensed, in the blue areas time has been expanded.
If you want to determine the degree of “shrinkage”, i.e., you want to compress a period of time more precisely, you can use the time-lapse or “Time Warp” mode. You can activate the “Time Warp” by clicking on the  icon in the toolbar. After activating, the window is grayed out to show that you are in “time-lapse” mode and no manipulation of the elements is possible. Now you can mark a certain area with the mouse . Then you can shrink, or “warp” an area by pressing down the Ctrl button and scrolling the mouse wheel. Shrinking time will turn the area red, expanding time turns the area blue.
You can define any number of different areas where the time distance should be shrunk or stretched.
Once you have completed your time manipulation, click the “warp” icon again to return to the normal display mode.
Individual time-lapse areas (“warp bubbles”) can be dissolved in the context menu by selecting “Delete Time Compression”. Alternatively, if you wish to remove all your time-lapse areas, you can click on the “Reset…” icon and select “Reset Warps” or hold down the Alt key and click on the ![]() icon.
icon.
The Papyrus Author Timeline is closely related to the underlying text. At any time, you can select “Jump to Text” in the context menu of an element. This will take you to the corresponding part of your text. You can also click the ![]() icon in the toolbar. This will take you to the section of your text relating to the element currently highlighted.
icon in the toolbar. This will take you to the section of your text relating to the element currently highlighted.
As times are directly related to their chapters, they will also be displayed in the Navigator and Organizer.
Managing how the Timleline elements appear in the Navigator window.
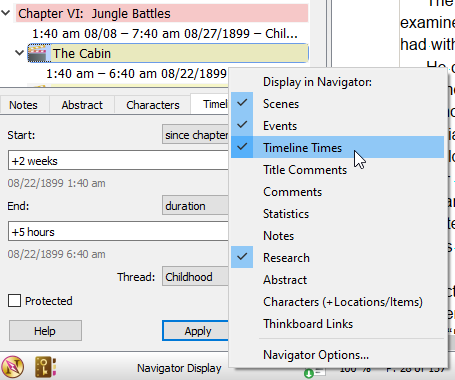
You can decide how your Timeline should appear in the Navigator through settings in the “Navigator Options” (click in the toolbar at the bottom of the Navigator). Here you have the option to show Timeline thread colors for chapters and scenes. Be aware that the story thread colors might then replace manually set chapter colors. Conversely, manually set colors for chapters etc. can also be displayed in the Timeline .
The Navigator can also display the Timeline times, if you want. These can be turned on/off from the Navigator menu.
Story threads are also displayed in the Organizer and can even be set by clicking on the current colored diamond with your mouse and dragging it to the desired thread. This of course has a corresponding effect on the Timeline.
As already mentioned, it is possible to assign the time elements from within the Navigator and the Organizer.
In the Navigator this is in the Timeline tab at the bottom of the Navigator window. In the Organizer in the Timeline area to the bottom right of the window.
Assigning times to elements in the Navigator and Organizer
The Characters of Your Story in the Timeline
Chapters and scenes can also show the acting characters in the Timeline. Just click the  icon in the status bar.
To do this, your text must be linked to a “My Characters” database.
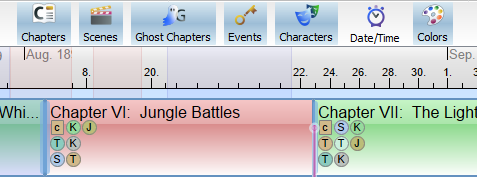
Characters appear as circles in your chapters and scenes.
Characters, places and items are displayed in color with the first letter of their name. If you move the mouse over such an initial letter, it is displayed in full length.
The color of each character can be changed in the Organizer dialog “Characters in <document name>.pap”. Right click on a character and “Select Characters and Their Colors…”
You can also select whether the respective character should be displayed at all in the Navigator and in the Timeline. The “None” button will untick all the boxes so no characters will appear. “All” will select every character. Alternatively, tick or untick each character if you wish to see some but not all.
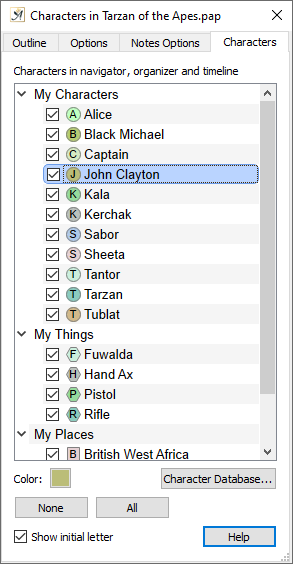
Viewing characters in the Navigator
 on April 1, 2020